Difference between revisions of "Subdomain setup"
(→Configuration) |
(→Configuration) |
||
| (2 intermediate revisions by one other user not shown) | |||
| Line 1: | Line 1: | ||
== DNS Management == | == DNS Management == | ||
| − | First, you will | + | First, you will have to set up a wildcard subdomain record for your host. Different hosting providers have different interfaces, but here are some examples. |
| + | |||
| + | === On Linode === | ||
Go to the DNS Manager section of your account and click on the domain zone your DW install is hosted on. Go to the "A/AAAA Records" section and note the IP address of the hosts: | Go to the DNS Manager section of your account and click on the domain zone your DW install is hosted on. Go to the "A/AAAA Records" section and note the IP address of the hosts: | ||
| Line 12: | Line 14: | ||
Here, you will want to add <code>*.yourdomain.com</code> and the IP address you noted on the last page. Save this form and a wildcard subdomain should be added to your A/AAAA Records section. | Here, you will want to add <code>*.yourdomain.com</code> and the IP address you noted on the last page. Save this form and a wildcard subdomain should be added to your A/AAAA Records section. | ||
| + | |||
| + | |||
| + | === Local development via dnsmasq === | ||
| + | |||
| + | If you've set up a Dreamwidth development server on your local machine, you can use <tt>dnsmasq</tt> to give you a local DNS server with wildcard matching. Install it with | ||
| + | apt-get install dnsmasq | ||
| + | The install should create the config directory <tt>/etc/dnsmasq.d/</tt> -- text files in there will be picked up and added to <tt>dnsmasq</tt>'s configuration. | ||
| + | |||
| + | Say you have a local webserver that you want to set up as <tt>avengers.mylocal</tt>. Create a file in <tt>dnsmasq</tt>'s config directory (eg <tt>/etc/dnsmasq.d/avengers</tt>) with the following contents: | ||
| + | address=/avengers.mylocal/127.0.0.1 | ||
| + | Now restart dnsmasq: | ||
| + | /etc/init.d/dnsmasq restart | ||
| + | ...and now anything ending in <tt>avengers.mylocal</tt> should resolve to <tt>127.0.0.1</tt>: <tt>avengers.mylocal</tt>, <tt>www.avengers.mylocal</tt>, <tt>thor.avengers.mylocal</tt>, <tt>www.loki.avengers.mylocal</tt>, ... | ||
== Configuration == | == Configuration == | ||
| − | {{Note|text= | + | {{Note|text=This section is enabled by default (note current as of November 2015).}} |
To configure your installation for user subdomains, uncomment the bolded lines in <code>$LJHOME/etc/config.pl</code>: | To configure your installation for user subdomains, uncomment the bolded lines in <code>$LJHOME/etc/config.pl</code>: | ||
Latest revision as of 15:09, 16 November 2015
DNS Management
First, you will have to set up a wildcard subdomain record for your host. Different hosting providers have different interfaces, but here are some examples.
On Linode
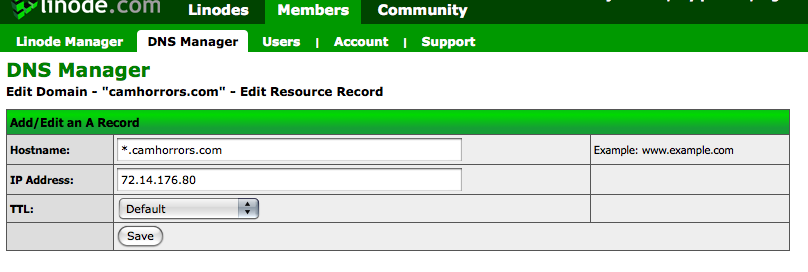
Go to the DNS Manager section of your account and click on the domain zone your DW install is hosted on. Go to the "A/AAAA Records" section and note the IP address of the hosts:
(Note: the above picture already has the wildcard listed in it. Yours won't have that yet, but will when you finish this.) You will want to click on "Add a new A/AAAA Record":
Here, you will want to add *.yourdomain.com and the IP address you noted on the last page. Save this form and a wildcard subdomain should be added to your A/AAAA Records section.
Local development via dnsmasq
If you've set up a Dreamwidth development server on your local machine, you can use dnsmasq to give you a local DNS server with wildcard matching. Install it with
apt-get install dnsmasq
The install should create the config directory /etc/dnsmasq.d/ -- text files in there will be picked up and added to dnsmasq's configuration.
Say you have a local webserver that you want to set up as avengers.mylocal. Create a file in dnsmasq's config directory (eg /etc/dnsmasq.d/avengers) with the following contents:
address=/avengers.mylocal/127.0.0.1
Now restart dnsmasq:
/etc/init.d/dnsmasq restart
...and now anything ending in avengers.mylocal should resolve to 127.0.0.1: avengers.mylocal, www.avengers.mylocal, thor.avengers.mylocal, www.loki.avengers.mylocal, ...
Configuration
To configure your installation for user subdomains, uncomment the bolded lines in $LJHOME/etc/config.pl:
# Support URLs of the form http://username.yoursite.com/ ?
# If so, what's the part after "username." ?
$USER_VHOSTS = 1;
$USER_DOMAIN = $DOMAIN;

# If you ONLY want USER_VHOSTS to work and not the typical /users/USER and /community/USER
# then set this option:
$ONLY_USER_VHOSTS = 1;
If you only want certain user classes to have user subdomains, do not set $ONLY_USER_VHOSTS to 1, or journals who do not have this user capability won't work!
You will also have to set a user capability in etc/config.pl called userdomain. If you want all users to have this capability, add it to %CAP_DEF:
%CAP_DEF = (
         'maxfriends' => 500,
         'userpics' => 1,
         'checkfriends_interval' => 60,
         'checkfriends' => 1,
         'styles' => 0,
         'todomax' => 25,
         'todosec' => 0,
         'friendsviewupdate' => 30,
         'findsim' => 1,
         'getselfemail' => 0,
         'userdomain' => 1
);
Otherwise, you will have to add 'userdomain' => 1 to one or more of the user classes listed in %CAP.
You also need to add an entry to %SUBDOMAIN_FUNCTIONS (and create this hash if it does not already exist):
%SUBDOMAIN_FUNCTION = (
    'community' => 'journal',
);

